For years, I avoided patterns that featured those mysterious diagrams filled with little symbols, assuming they were for “advanced” crocheters only. I clung to written instructions, even when they were pages long for a single doily. Then, I decided to tackle a traditional Irish lace pattern. The written instructions were a novel of abbreviations and parentheses. In frustration, I looked at the chart… and had an epiphany. In one glance, I could see the entire shape, the symmetry, and how the stitches related to each other. It was a map, and it was beautiful.
Crochet charts (or symbol diagrams) are a visual, international language that transcends the US/UK terminology barrier. Once you learn the basic “alphabet” of symbols, you can follow patterns from Japan, Russia, or Brazil without speaking a word of the language. They show you the spatial relationship of stitches in a way words never can. In this guide, I’ll demystify charts completely. We’ll start with a simple key, learn how to follow the map (where to start, which way to go), and I’ll show you side-by-side comparisons of written instructions versus their chart equivalents. You’ll discover that for many projects—especially lace, motifs, and complex textures—charts are not the hard way, but the easy way.
Why Charts Are a Game-Changer (Especially for Visual Thinkers)
- They Show the Big Picture: You can see the stitch pattern repeat, increases, decreases, and the final shape at a glance. No more getting lost in line 47 of a written pattern.
- They are International: The symbols are standardized by the Craft Yarn Council and used globally. A chain symbol means the same thing in Tokyo as it does in Texas.
- They Reduce Errors: It’s much easier to spot if you’re on the wrong stitch because you can see your place on the “map.” You can count symbols visually.
- They Work Brilliantly with Video Tutorials: Many teachers use charts as a reference. Following along? The chart shows you what the next step should look like, not just what it’s called.
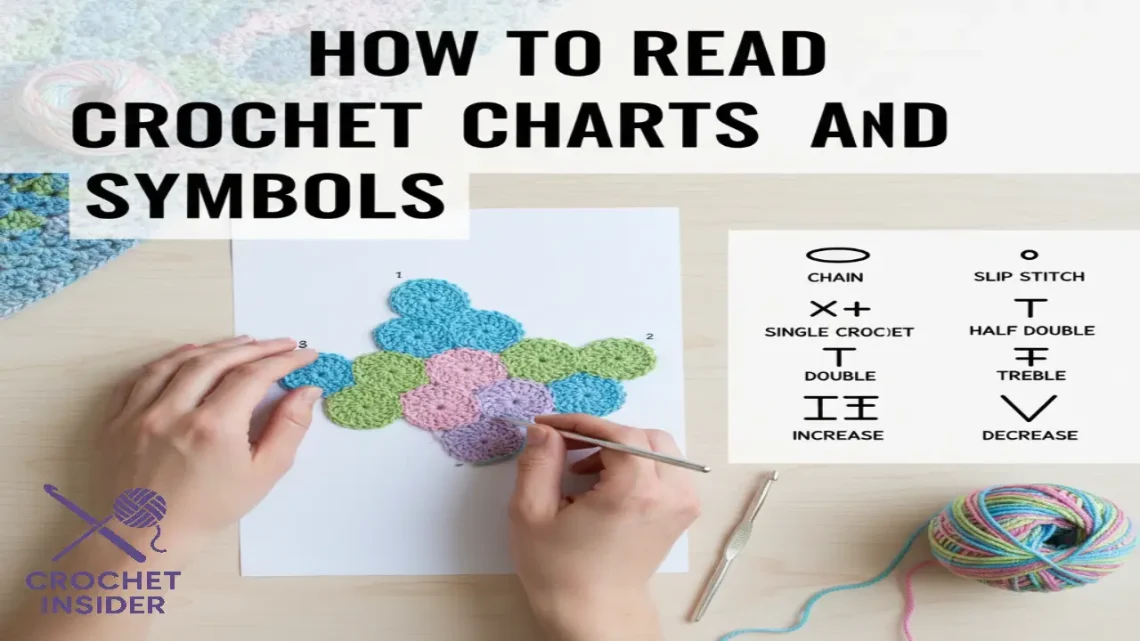
The Alphabet: Your Guide to Basic Stitch Symbols
Think of each symbol as a little drawing of what the stitch looks like from above and how it’s constructed. Here is the essential alphabet. Bookmark this section!
- O or ● (Chain – ch): A simple oval or dot. The foundation of most charts.
- • (Slip Stitch – sl st): A small filled dot or a short dash. It’s flat and connecting.
- + or × (Single Crochet – sc): A plus sign or a cross. A short, simple stitch.
- T with one crossbar (Half Double Crochet – hdc): Looks like a capital “T”. The crossbar represents the initial yarn over.
- T with two crossbars (Double Crochet – dc): A “T” with two horizontal lines. Each line represents one of the two yarn overs.
- T with three crossbars (Treble Crochet – tr): A “T” with three lines. You get the pattern—more yarn overs, more lines.
- V or Λ (Increase – 2 st in same st): Two stitch symbols emerging from the same base point below.
- Y or X (Decrease – sts tog): Multiple stems from below converging into one symbol at the top. It shows stitches being combined.
- — (Over a chain space): A stitch symbol drawn OVER a oval chain symbol means you work your stitch into the chain space, not into a stitch.
- ◁ or ▷ (Directional symbol): Arrows or numbers indicate the direction of work or the start/end of a round.
How to Read the Map: Direction, Rounds, and Repeats
This is where people get lost. Let’s break down the logic of a chart’s layout.
For Work in ROWS (Flat Pieces):
- Foundation Row: Usually a row of chain symbols at the very bottom.
- Row 1: You start at the bottom-right corner of the chart (often marked with a “1”). You work from right to left. Read the symbols in that direction.
- Row 2: At the end of Row 1, there is typically a turning chain symbol (a few ovals). This lifts you up to Row 2. You now turn your work and crochet back across. On the chart, you read Row 2 from left to right. Charts for rows often have odd-numbered rows on the right, even on the left.
- Right Side/Wrong Side: Sometimes charts are drawn only for the Right Side (RS) rows. The pattern will note that on Wrong Side (WS) rows, you simply work the stitches as they appear (e.g., a dc symbol on a WS row is still a dc).
For Work in ROUNDS (Motifs, Granny Squares, Hats):
- Center: The chart starts in the middle, usually with a ring of chains or a magic circle symbol.
- Round 1: You work outward from the center. The direction is almost always counter-clockwise (right-handed). The chart will have an arrow or the number “1” to show the start point.
- Subsequent Rounds: Each round surrounds the previous one. Joins are often shown with a slip stitch symbol connecting back to the first stitch of the round. Repeats within a round are often marked with heavy lines or asterisks on the chart itself.
Understanding Repeats on a Chart:
This is the best part. Look for:
- Bold or Colored Lines: A box drawn in a bold line around a set of symbols indicates the pattern repeat. You work the symbols inside the box, then repeat that sequence across the row or round.
- Asterisks (*) on the Chart: Sometimes an asterisk marks the start of a repeat section.
- Symmetry: Our brains are good at recognizing patterns. The chart will often look symmetrical. If your work doesn’t match the symmetry, you know you made an error.
Side-by-Side: Written Instruction vs. Chart
Let’s translate a common stitch pattern to see the clarity a chart provides.
Written (US): “Row 1: Dc in 4th ch from hook, *ch 1, sk 1 ch, dc in next ch; rep from * across. Row 2: Ch 3 (counts as first dc), turn, dc in first ch-1 sp, *ch 1, dc in next ch-1 sp; rep from * across, dc in top of turning ch.”
The Chart: A visual map where you immediately see the alternating dc and ch-1 spaces, and how the dc of Row 2 sits directly into the ch-1 space of Row 1. You don’t have to hold the logic in your head; you just match your work to the picture.
My Pro Strategy for Using Charts Successfully
- Always Find the Key: No chart should be without a symbol key. Locate it first. If a pattern doesn’t have one, it’s poorly written—find a better source.
- Mark Your Place Physically: Use a sticky note or highlighter tape on the chart to mark the row/round you’re on. Move it up as you go. For rounds, I sometimes use a bobby pin to point to the stitch I’m about to make.
- Trust the Picture, Not Just Your Memory: Look at the symbol for the next stitch, not the one you just made. Ask: “Is the next symbol a T with one line or two? Is it coming out of one point (increase) or many (decrease)?”
- Combine with Written Instructions at First: When learning, use both. Read the written line, then find it on the chart. Soon, you’ll rely less on the words.
- Start with a Simple Motif: Practice on a small, free chart for a classic granny square or a simple heart appliqué. The small scale lets you complete something quickly and build confidence.
- Embrace Charts for Lace & Texture: For lace stitches, cables, or mosaic crochet, charts are indispensable. Trying to write out “front post double crochet around the stitch two rows below” is a nightmare; a chart shows it elegantly.
Learning to read charts is like learning to read music. At first, you painfully decode each note. Then, you start to see phrases. Eventually, you can just play. Give yourself the gift of this skill. It will make you a faster, more accurate, and more confident crocheter, with the entire world’s patterns at your fingertips.
Chart Your Course Forward:
- US vs UK Glossary: The Written Foundation – Understand the words behind some symbols.
- Stitch Library: See Each Stitch in Action – Connect the symbol to the real-life stitch.
- Classic Granny Square: A Perfect First Chart Project – Practice on an iconic pattern.
- Explore Lace: Where Charts Truly Shine – See the power of visual patterns.


